I am odd when it comes to citrus fruits: I love the flavors, but if it comes to eating one in its whole form, such as orange slices, I am completely turned off. The texture is wholly unappealing, like eating little fleshy juice pods enveloped in a flimsy waxy membrane. I can’t. I just can’t. However, if I smash and grind that orange’s flesh and release its juices into a glass, I can’t get enough! I enjoy adding elements of citrus into a fair share of my meals, be it laying lemon slices beneath my baked chicken breasts or folding lime zest into a bowl of whipped cream.

Vegan Orange Polenta Baked Donuts

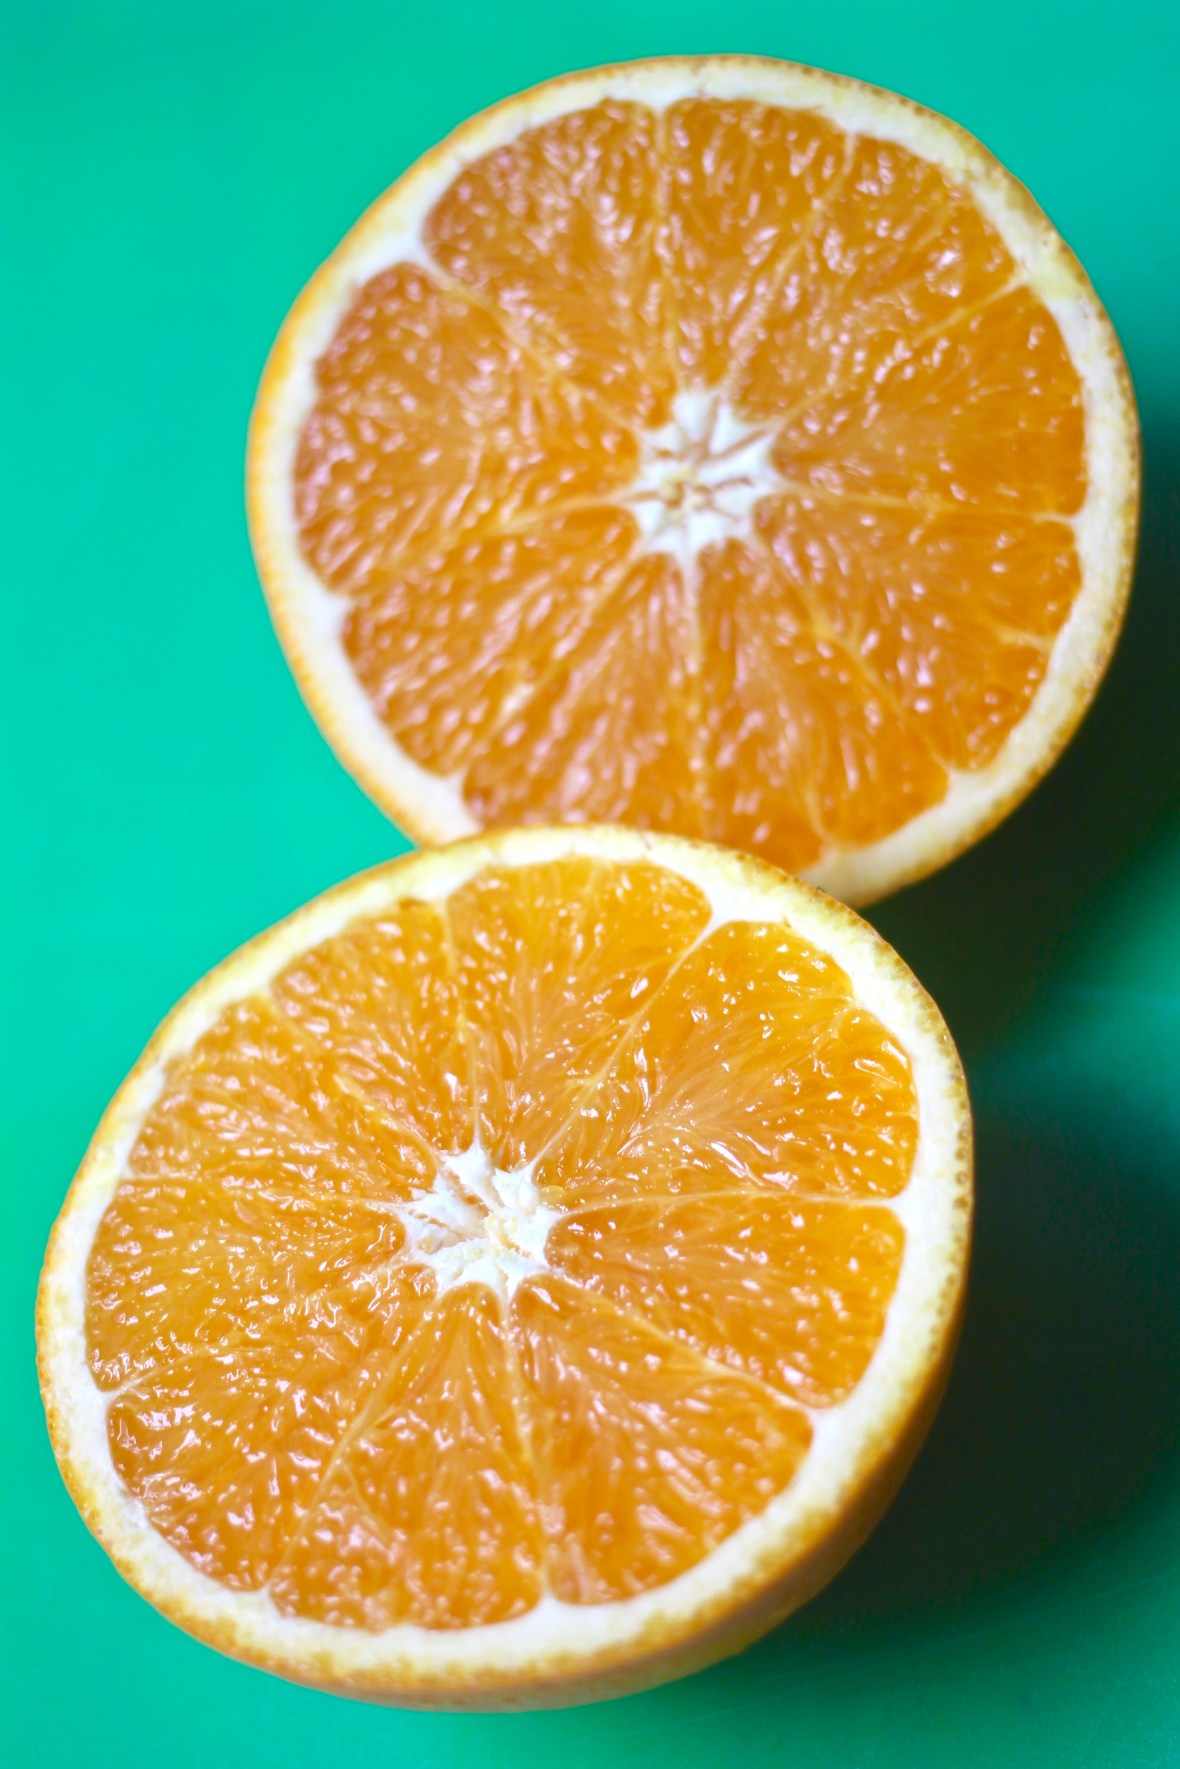
On a chilly Saturday with a light snow in the forecast, I was feeling cozy and ready to bake. After an eventful morning of going to the gym and…well…scrolling through the Explore tab on Instagram, my eyes were instantly drawn to ruby red triangles atop something surely delicious. I clicked the photo to enlarge it. “VEGAN OLIVE OIL AND BLOOD ORANGE MUFFINS”, I read in striking caps locked letters. I love blood oranges! Their color is so warm, impossible to draw my eyes away from. I said, “That’s it! That’s what I’m going to bake!” As I walked into CTown, the section usually full of autumn squashes had been replaced with grapefruits and oranges of all sizes. I excitedly walked towards them, my face falling when I realized that none of the oranges were of the blood variety! *sigh* I cracked my knuckles and twisted my mouth to express disappointment, but, a navel orange was better than no orange. I bought two large ones and headed home, eager to bake and improvise.

Vegan Orange Polenta Baked Donuts

Upon arrival home, I quickly I remembered that I didn’t have a muffin pan, either. In my head, I recalled a roommate once saying to me, months ago, “I have one! I put it in the cupboard!” I looked and came up empty-handed. While my first inclination was to grab a small baking dish, there was my trusty donut pan, beckoning me to fill it up with some fresh batter.

I could not resist the call.

Vegan Orange Polenta Baked Donuts

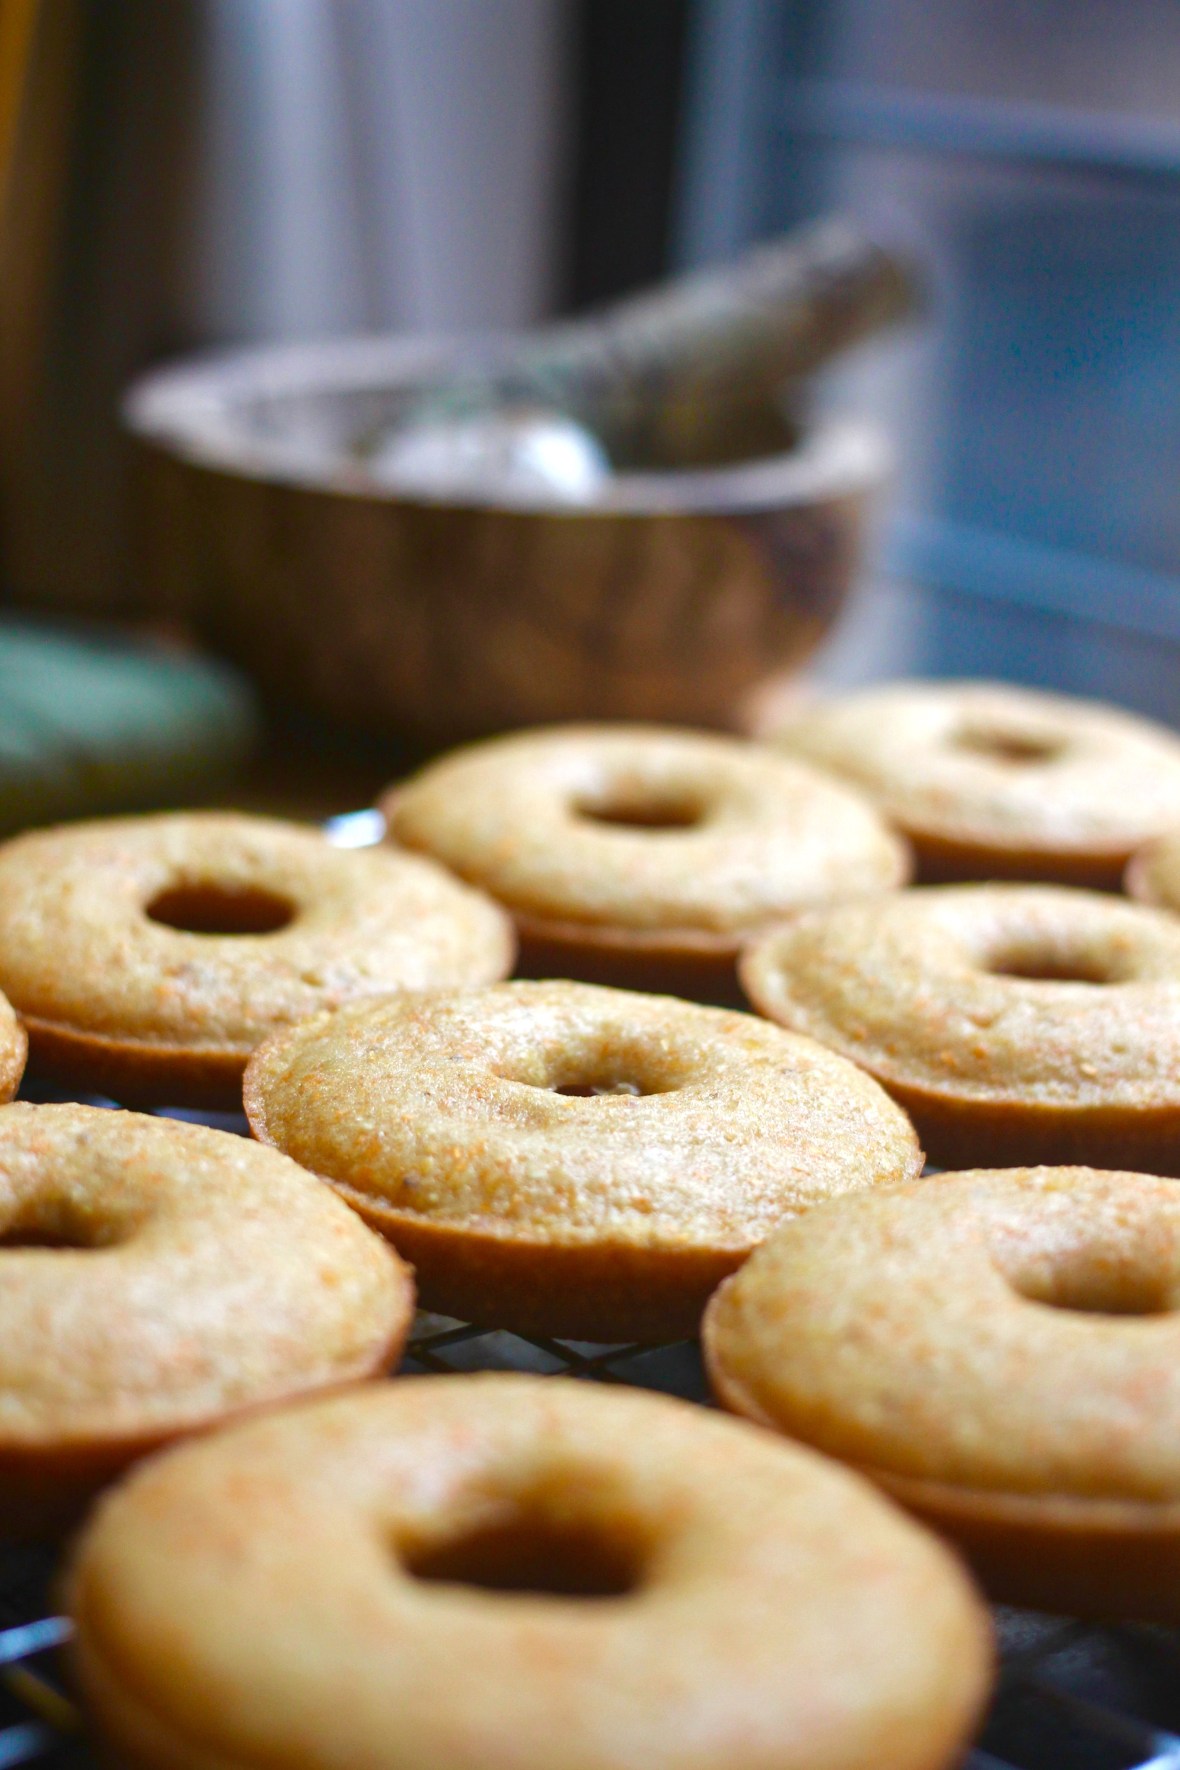
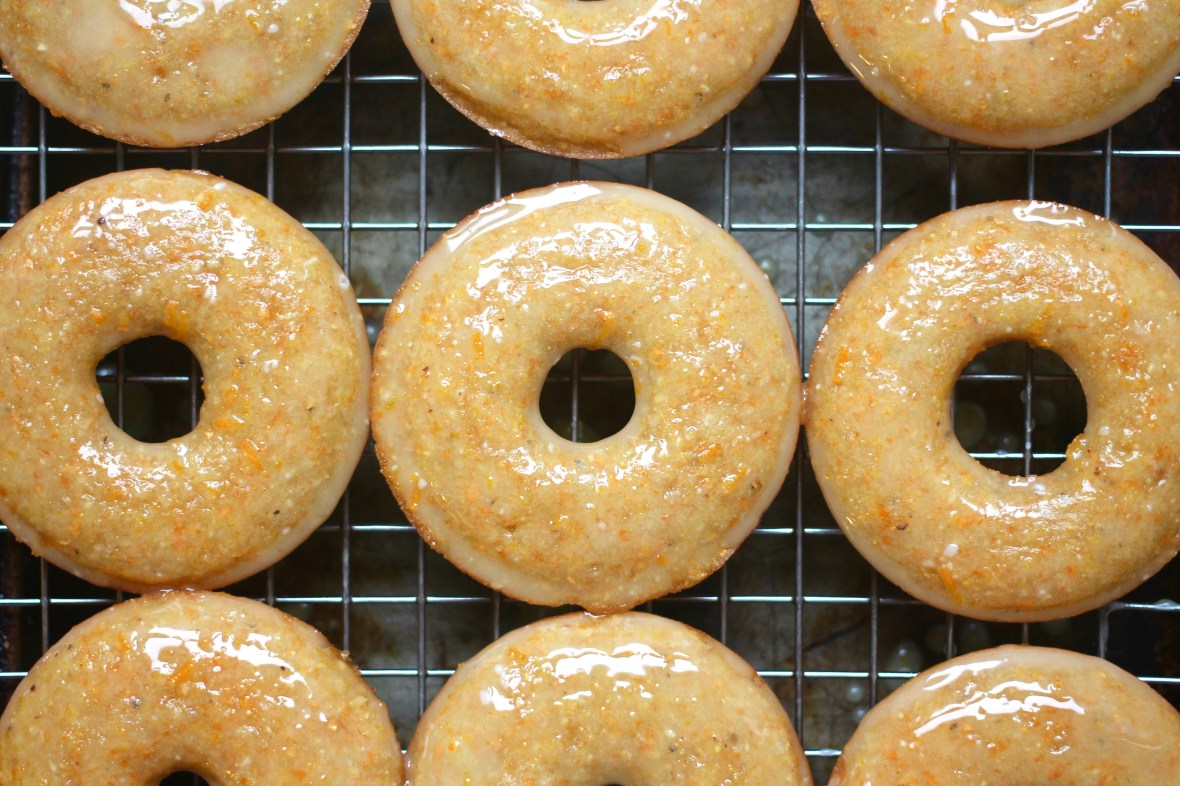
I have followed other vegan donut recipes in the past, such as Giselle’s bomb Vegan Baked Golden Milk Donuts (with my almost-vegan adaptation right here). I thought to myself, “Well…either this recipe will work, as is, as a donut…or it won’t. Let’s do this!” Indeed, I did it, and with very few tweaks, the end result was pretty damn delicious! What I pulled from my oven was a baked donut akin to cornbread with a citrusy essence. The polenta certainly provides a slightly crunchy interior; I baked the first batch of donuts immediately after making the batter, and I baked the second batch after I had let the better sit for almost 45 minutes. I’ve decided that letting it sit provides more time for the corn to soften; I could tell a distinct difference between the two batches of donuts. While both were great, I would opt for the slightly marinated corn kernel grounds.

Vegan Orange Polenta Baked Donuts

Totally healthy, you guys. Totally. Eat the whole dozen with abandon!

Vegan Orange Polenta Baked Donuts
(Makes 12 donuts)
(Recipe adapted from Recipes From A Pantry’s recipe for Vegan Olive Oil & Blood Orange Muffins)

Ingredients:

Donuts:

– 1 cup polenta, preferably coarse (I used Bob’s Red Mill Polenta)
– 1 cup flour
– 1 teaspoon baking powder
– 1/2 teaspoon baking soda
– 1/2 teaspoon salt
– 1 cup non-dairy milk (I used Malk Organics Unsweetened Almond Malk)
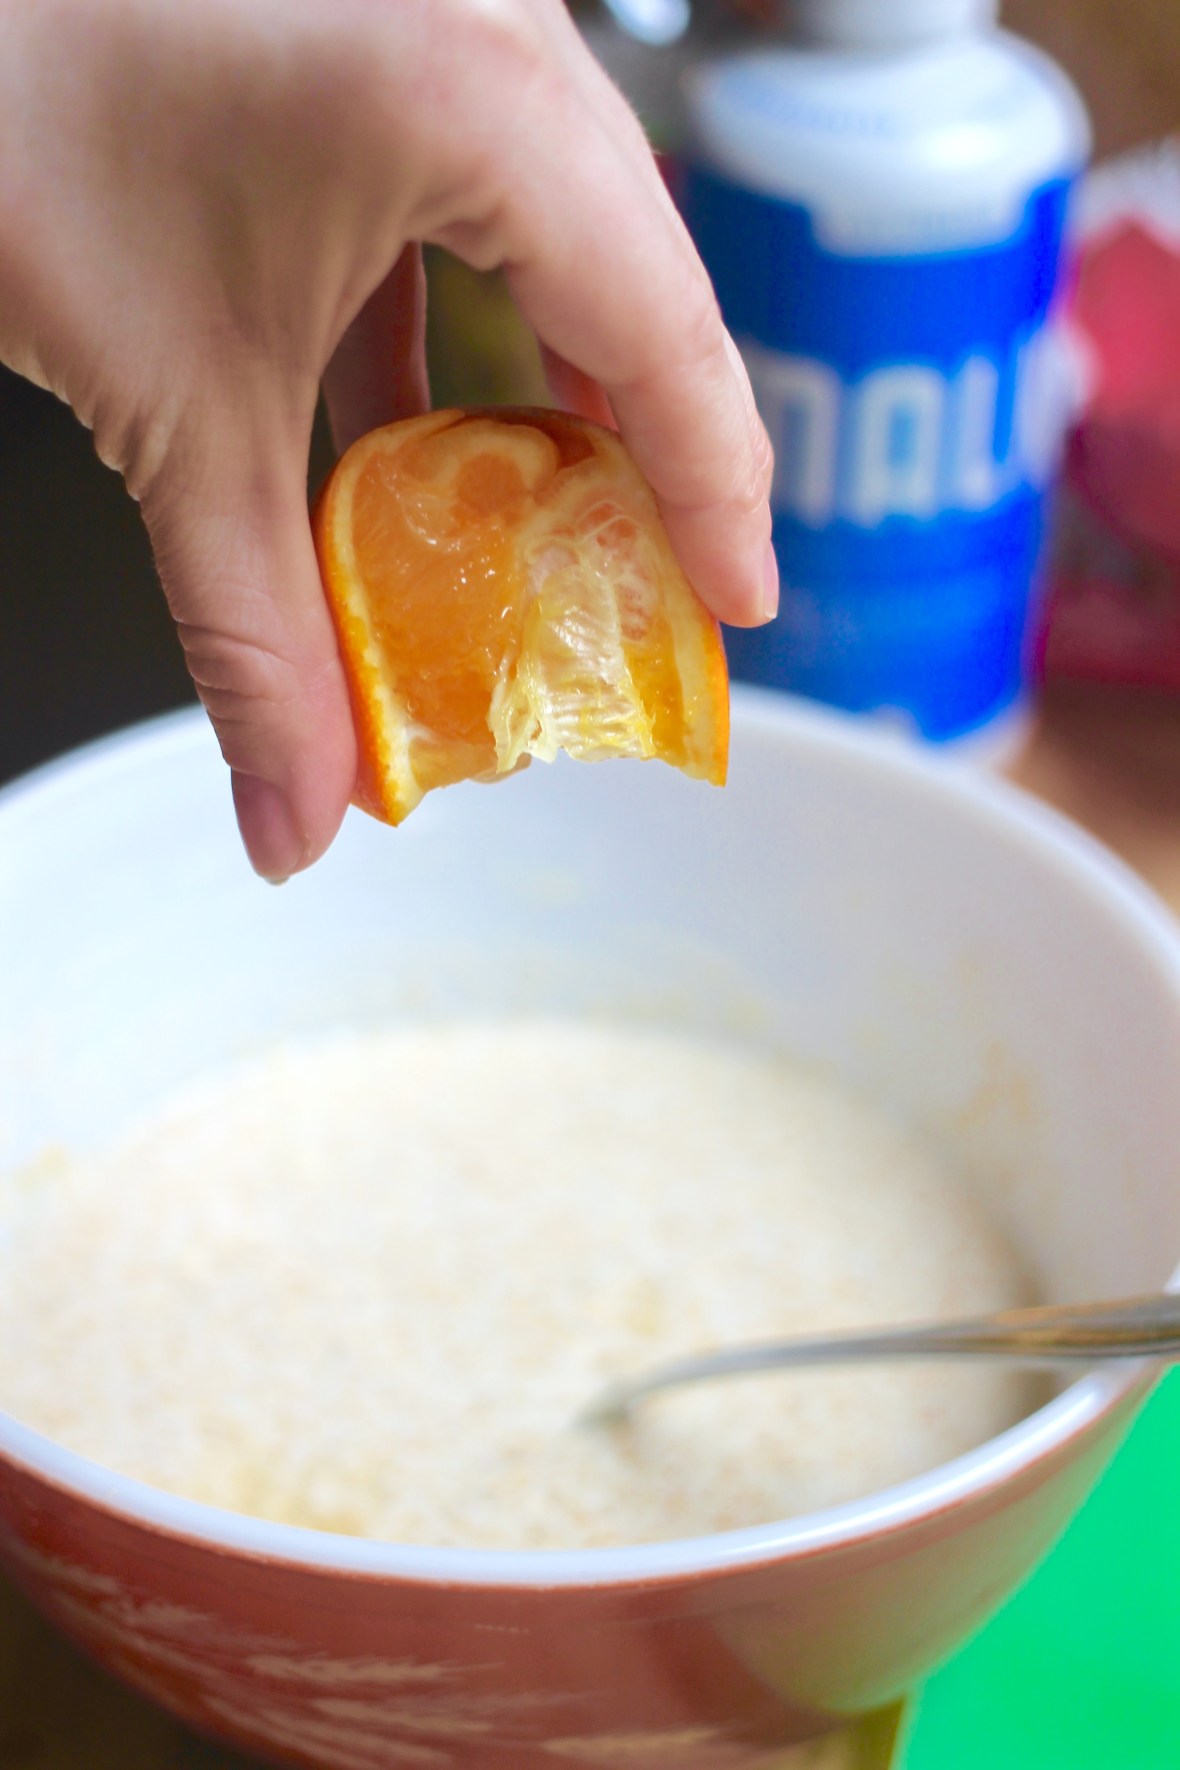
– 1/2 cup orange juice, fresh-squeezed (I used a large navel orange)
– 1/3 cup olive oil (or another vegetable oil may be substituted here)
– 1/3 cup sugar (I used Sugar In The Raw)

Orange Glaze:

– 1 teaspoon orange zest
– 6 tablespoons confectioners’ sugar
– 2 tablespoons orange juice; fresh-squeezed

Before We Get Started…

– If you have a six cavity donut pan (which is the usual capacity for your average donut pan), be sure to clean out and re-grease the cavities before baking your second batch of donuts; this recipe, if followed properly, makes exactly twelve donuts.

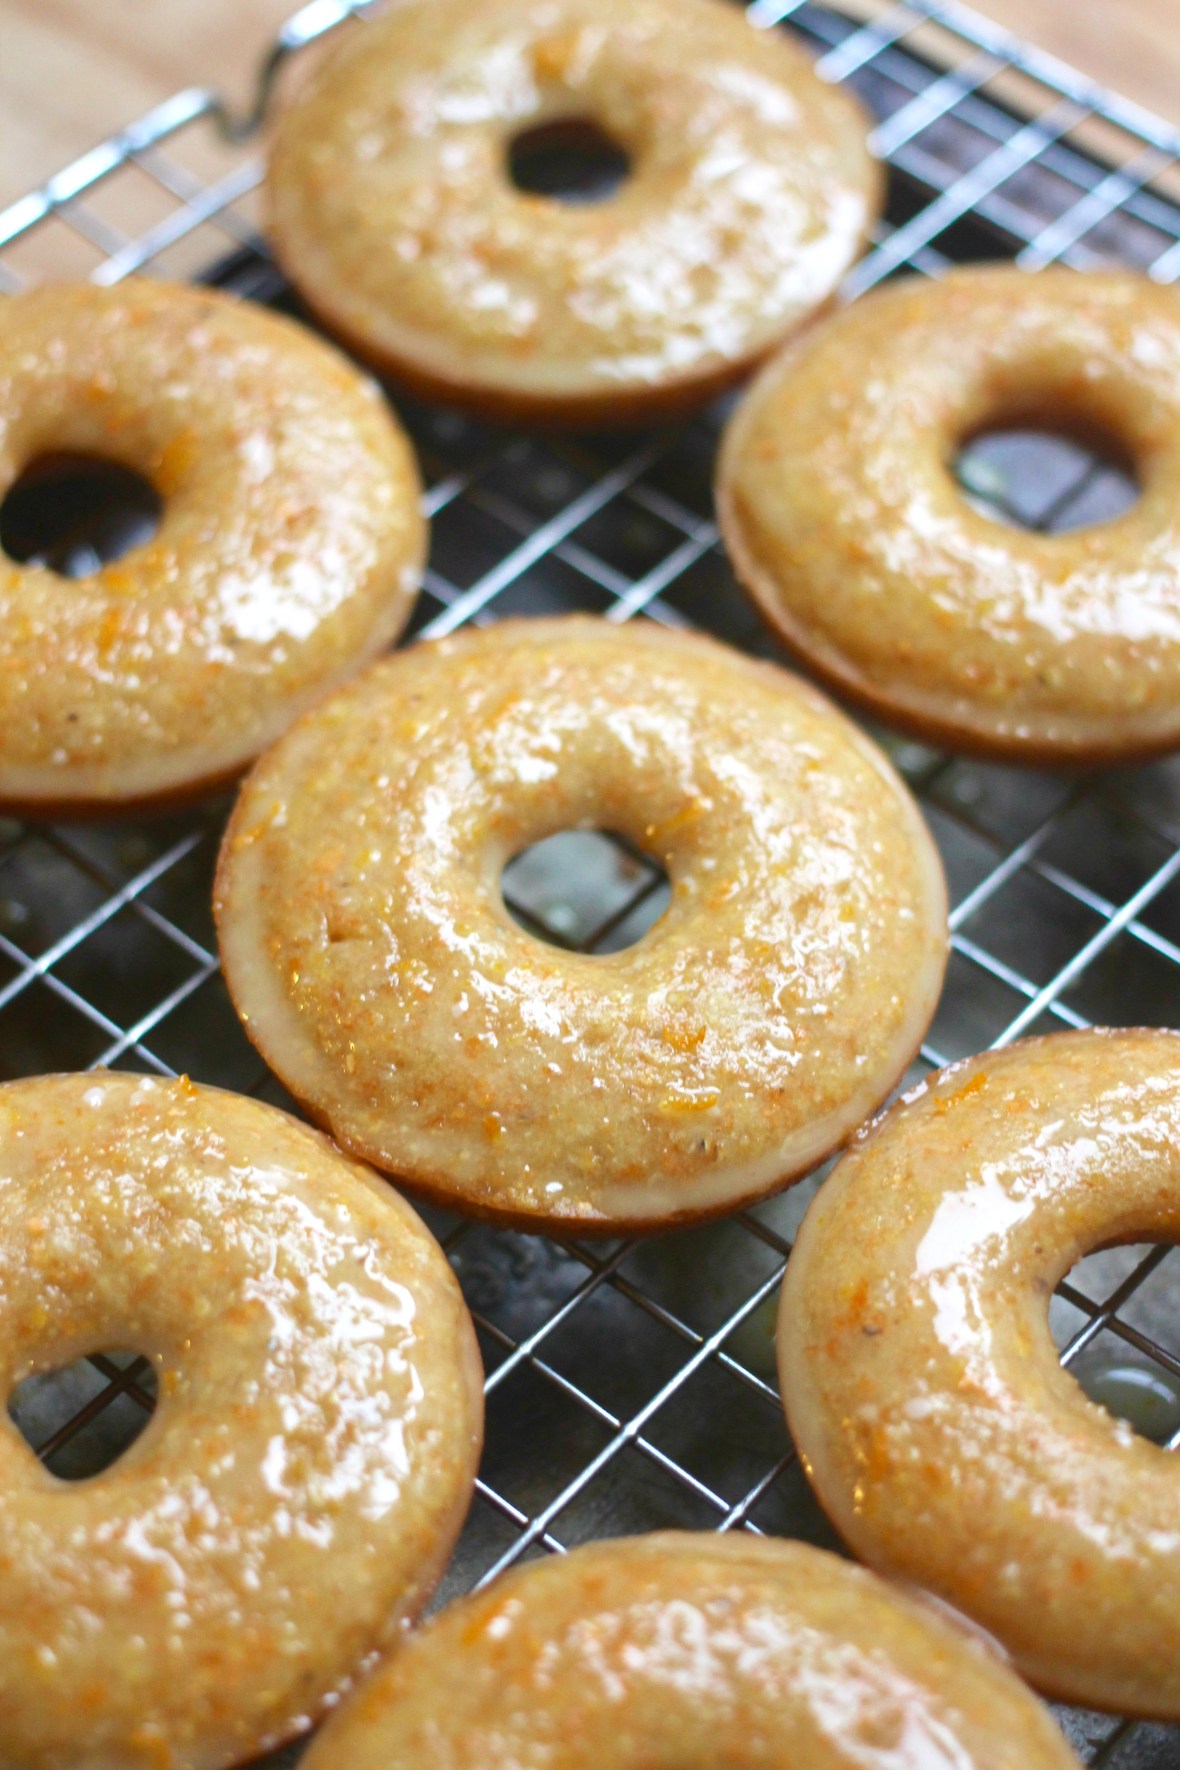
– The glaze mixture will look thin, and that is okay! The goal is not to glaze the donuts in a traditional sense; once dipped, the donuts will have a slight sheen and the remainder of the glaze will absorb into the donuts.

Directions:

1.) Preheat oven to 350°F. Lightly grease the inside of the donut pan’s cavities. Set aside.

2.) In a large bowl, combine the polenta, flour, baking powder, baking soda, and salt in a large bowl. Set aside.

3.) In a medium bowl, whisk milk, orange juice, olive oil, and sugar until thoroughly combined.

4.) Pour the wet ingredients into dry ingredients and mix until well combined. Cover bowl with plastic wrap and allow to sit for 30 – 45 minutes.

5.) Transfer mixture to a pastry bag or a gallon-sized seal-top plastic bag; if using plastic bag, cut off small corner to pipe out mixture. Evenly pipe mixture into cavities of donut pan until filled. NOTE: If you prefer not to pipe, you can carefully spoon mixture into the cavities until filled.

6.) Place in oven and bake for 12 – 15 minutes. Remove from oven and place pan on cooling rack for 20 minutes; carefully remove donuts from pan and allow to continue cooling on cooling rack. As mentioned in Before We Get Started..., clean and re-grease cavities to make remaining donuts; repeat directions in this step for remaining donuts.

7.) In a medium to large bowl, mix all ingredients until combined. Set a wire rack over a baking sheet or other easily washable surface to catch any glaze runoff. Gently dip the tops of the donuts into the glaze, carefully turn over, and place the unglazed side on the wire rack. Repeat until all donuts are glazed.

Vegan Orange Polenta Baked Donuts

Though I have little room in my freezer (due partly to roommates that have frozen vegetables and TV dinners…), I still love to cook pots of soup in the winter and freeze the leftovers for a rainy day (or, better, a snowy day). Soup is a comfort food to me; growing up, I ate bowls of my Nana Fracaro’s chicken soup with tubettini pasta, no matter if it was in the middle of winter or at 11:30 on a hot summer’s morning while we watched “The Price Is Right“. Whenever I go to a restaurant, if I see a good Soup Du Jour on the menu, I go for it. I’ll take my soups any way I can take them, though I tend to lean towards a good classic chicken noodle, gazpacho, vichyssoise, French Onion, or cream of tomato.

Over the years, I’ve been trying to lighten my recipes up where I can (such as with my plant-based Creamy Tomato Soup with Cashew Cream or my Tomato & Zucchini Noodle Soup with Veal Meatballs), and, well, here is another example! Trying to get back to my good veggie grind, I wanted a hearty vegetable-packed soup to last me a few work days.

Peanut Butter Banana Oatmeal

Between the tomatoes, kale, carrots, onions, garlic, and herbs, I felt as though I ate the entire garden. That is not a bad thing.

Kale tomato white bean soup

Kale, Tomato, & White Bean Soup
(Adapted from the New York Times recipe for Quick Tomato, White Bean, & Kale Soup)

Ingredients:

– 1 medium white or yellow onion, chopped
– 1 large carrot, chopped
– 2 large garlic cloves, minced
– 1 14-ounce can chopped tomatoes, with juice
– 1 medium Yukon Gold or Russet potato, peeled and diced
– 4 cups kale, stemmed, washed, and roughly chopped (roughly 1/4 pound of kale)
– 1 can white beans, drained and rinsed
– 1 tablespoon extra virgin olive oil
– 6 cups water
– 1 tablespoon tomato paste
– 1 teaspoon oregano
– 1 teaspoon dried thyme
– 1 teaspoon dried parsley
– 1 – 2 cups pre-cooked rice (optional)
– Salt and pepper, to taste

Before We Get Started…

– This soup tastes absolutely amazing on its own! That being said, after making and photographing my initial batch, I added some leftover rice I had from some Indian takeout I had a few nights prior. WOW. The soup was really enhanced by the rice. Though loaded with vegetables and beans, the broth is, well, brothy! It’s not creamy or fatty. The rice does add a tad of starch to the broth, as well an a little bit of bulk to the soup in general. It’s a lovely addition if you choose to go that direction!

Directions:

1.) Place a large heavy-bottomed saucepan or dutch oven on the stove. over medium heat. Add olive oil, allow to heat up slightly, then add add the onion, carrot, and a pinch of salt. Cook vegetables for approximately 6 to 8 minutes or until tender; be careful to not let vegetables brown. Add the garlic and cook, stirring, for one minute.

2.) Stir in tomatoes and juice from the can and combine with vegetables. Continue to cook over medium heat for 8 – 10 minutes or until until the tomatoes have slightly reduced.

3.) Add water, tomato paste, oregano, thyme, parsley, and potato. Bring soup to boil, cover, and simmer until potato chunks are tender, roughly 10 minutes.

4.) Add the kale and simmer another 10 minutes, until the kale is wilted down but still holds some of its shape. Stir in the beans and heat through for 5 minutes; if adding pre-cooked rice, add and stir in with beans. Serve immediately or allow to cool slight before putting into storage containers for refrigeration or freezing.

In the world of blogging, one thing you need to do is find at least one good person to collaborate with. It’s beneficial to everyone involved. Ideas are crafted. Bonds are formed. Comfort levels are expanded. Traffic is increased and analytics become more interesting! (Sorry, I work in data outside of this food blog. Ha! Numbers occasionally make me geek out. 😉 )

For many years, I’ve been following Yoga By Candace by Candace Moore, a well-known yoga instructor who runs a healthy lifestyle blog, incorporating her practice into it as well as fitness tips, recipes, and wonderful healthful products. She just released her first book, Namaslay: Rock Your Yoga Practice, Tap Into Your Greatness, & Defy Your Limits, which lays out best practices for the craft as well as how she’s persevered after a very serious illness. I’ve started reading though, and as a non-yoga practicer that has been interested yet a bit intimidated by the whole concept of yoga, she breaks it down in a way that soothes my angst about doing it incorrectly.

Can I throw it back? I’ve actually known Candace since we were nuggets! We lived a few houses away from each other and would play together a lot as kids. If there is one thing I’ll always remember, it was listening to “Love Shack” by The B52s on vinyl (before it was technically vintage and still a primary way of listening to music if you didn’t want to rewind a cassette tape) and lip syncing along; Candace, I’m not sure if you remember this, but you always made to lip sync Fred Schneider’s parts of the song while you got to lip sync Kate Pierson and Cindy Wilson’s parts. I was always upset you never let me do the female parts, though, in hindsight, doing Fred Schneider’s parts is pretty cool. Ha! Also, in a throwback surely all 80s babies can appreciate, we, along with our neighbor Amy, attempted to form a Babysitters’ Club…I remember the excitement of conceptualizing our version of it, but don’t remember it actually panning out. Haha. Needless to say, life happens, adolescence happens, and we had our own friend groups by the time we got to high school. Around 2013, I discovered her blog via a mutual friend on Facebook, and started following along, impressed by her posts. Social media can work in many ways, sometimes driving people apart (hello, politics!), but social media definitely brought us back together again. After posting a status on my personal Facebook page, encouraging my friends to follow this blog’s IG feed, I got a message from Candace over Facebook messenger, and, well…

As I attempt to move this blog from mere “hobby” status into possibly more of a side business in the next few years (I have my eyes on the prize of, one day, crafting a cookbook), I am thankful for all of the opportunities I have to expand my reach, and having Candace reach out to me has made me so incredibly happy. I am glad to have her help, and I am also glad to (hopefully!) enrich her site with wholesome recipes that her readers will enjoy.

Please follow this link for the recipe Apple Pumpkin Oatmeal, featured on Yoga By Candace.

apple pumpkin oatmeal

‘Tis the season for the slow cooker to make its annual trip from the lower cabinet near my sink to its rightful place upon my already cramped breakfast bar. (Typical Manhattan Apartment Life, yo.) I know most people will use their slow cooker year round, but I’m strictly an autumn and winter user. It’s just how I roll. ¯\_(ツ)_/¯

I’ve been searching the World Wide Interwebz for new and unique ways to use my slow cooker beyond just making soups or shredded meats. Creating slow-cooker desserts intrigues me, but I’m looking outside of the realm of that, for now. On a well-spent work lunch break, I stumbled upon a recipe for slow cooker bread. BINGO! This was the unique recipe that I had been craving! Via Kleinworth & Co., I decided to give their recipe for Slow Cooker Black Bread a roll. (Get it? Roll? Yeeeah, I love those bad puns. Bless you if you continue to read this post. Ha!)

slow cooker brown bread rolls

Now, the first time I made this recipe, I questioned it. I followed its directions and measurements to an absolute T, minus using instant coffee (or any coffee!) in my mix. I would like to think that that simple omission wouldn’t affect the integrity of my dough. That being said…by the time I got to the step in which I had to knead the dough, it was nothing short of batter in my bowl. Granted, I was doing this by hand and not with a dough hook; with the insanity of my post-bedbug extermination coming to a close, I still have my Kitchen Aid mixer tucked away in a place that’s not easily accessible. The original recipe called for 2 & 1/2 cups of flour, total. By the time I was finished adding in additional 1/2 cup increments, I was up to 4 cups of flour! By that point, I had achieved a kneadable texture. Also, the cooking time on the original recipe definitely varied from the time I took to bake it (90 minutes in the original vs. 2 hours for mine), however, that didn’t shock me since all slow cookers are not made equal.

slow cooker brown bread rolls

You know what? WHATEVER. I ended up making rolls that were so delectable, the trial and error was worth it. These rolls are wonderful! The molasses and chocolate infuse them with the most wonderful smoky sweetness! I brought them over to a friend’s house for his parents and brother, and they were all fans as well! I’m glad they enjoyed them. I wouldn’t want to be kicked out of their house. 😏 I think these rolls would be a hit on any dinner table in these cold months ahead, especially at Thanksgiving. *hint hint*

slow cooker brown bread rolls

Of note, these babies are WONDERFUL slathered with some homemade pumpkin butter, also cooked up in my slow cooker! (On a different occasion though, but of course.) I made some based on this recipe by Practical Stewardship, and I can absolute vouch for it. Mmmmm!

slow cooker brown bread rolls

Slow Cooker Brown Bread Rolls
(Recipe adapted from Kleinworth & Co’s recipe for Slow Cooker Black Bread)
(Makes approximate 10 – 12 rolls)

Ingredients:

– 1 cup warmed milk, dairy or non-dairy
– 1 tablespoon rapid-rise yeast
– 4 tablespoons unsalted butter, melted
– 2 & 3/4 cups all-purpose flour (see Before We Get Started…)
– 1/2 agave nectar
– 1/4 cup honey
– 2 teaspoons molasses
– 1 tablespoon cocoa
– 1 tablespoon sugar
– 1 teaspoon salt
– 1/8 cup old fashioned rolled oats (optional, to sprinkle on top of rolls)

Before We Get Started…

– As I mentioned in the prelude, the amount of dough I used to create this differed a fair amount from what I used based on the original recipe. After trial and error, I’d say to start with using the aforementioned 2 & 3/4 cups of flour. If the bread dough still seems too sticky to knead after Step #3, add more flour in 1/4 cup increments and mix until the dough yields a kneadable texture.

– Feel free to use 3/4 cup honey in place of the 1/2 cup agave nectar & 1/4 cup honey mix.

Directions:

1.) Line slow cooker with a large piece of parchment paper and carefully mold to the outline as best as possible. Lightly spray parchment paper with cooking oil or use one tablespoon of vegetable oil and spread with basting brush or clean paper towel.

2.) Heat milk in a mircowave or a small saucepan until just warmed to the touch; do not allow milk to bubble. In a large bowl, add warmed milk and sugar, then sprinkle yeast on top. Do not mix; wait five minutes for yeast to begin to bloom, then mix until combined.

3.) Add part of the flour (1 & 1/2 cups), salt, butter, and molasses to the yeast mixture. Stir until combined, then let dough rest for 5 minutes. Add the remaining flour, cocoa, agave nectar, and honey. Stir until combined; at this point, the dough should start to take on a doughier and kneadable consistency. (Please see Before We Get Started… if your batter is still a little bit sticky.)

4.) Sprinkle flour on a flat, clean surface. Turn dough onto surface and knead for 10 minutes or until dough is uniformly elastic. Sprinkle dough with additional flour when kneading, if necessary.

5.) Pull off pieces of dough and shape into rolls, rolls should fit in palm of your hand, about twice the size of a golf ball. Place rolls together in parchment paper-lined slow cooker; it is fine if rolls touch. If you have a smaller slow cooker (such as I do!), it is fine to layer the rolls if not all of them can fit on a singular level. Conversely, you can wrap additional dough tightly in plastic and store in the fridge to bake later. (Such as I DID.) Sprinkle dough with (optional) oatmeal.

6.) Cover rolls and turn on slow cooker to High. Cook for 90 minutes; if rolls are still tacky to the touch or do not not have hard exteriors, cook for up to an additional 30 minutes. These rolls should be finished by the two hour mark!

7.) When rolls are finished baking, turn off slow cooker and remove top. Allow rolls to sit for 10 minutes before removing. After 10 minutes, remove and place rolls on a wire rack to cool. Eat immediately after cooling or wrap firmly in plastic wrap to maintain freshness.