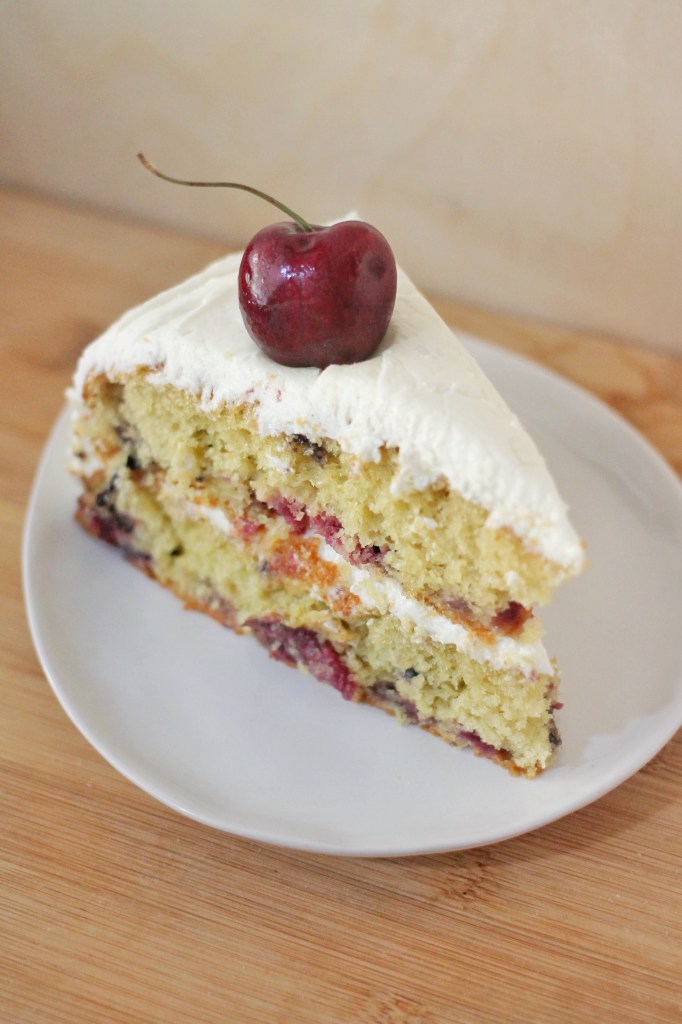
Off the bat, I’ll say this: It’s a “cheater cake”. Read: I added cherries to a box of Duncan Hines yellow cake mix.

We all have our Sandra Lee semi-homemade moments.

While I do love making cakes from scratch – namely, my baked cake donuts! – the simplicity of having a cake mix or two in the pantry when I have a craving is invaluable to me. I’m not the Food Police here: make your cake from scratch, buy a cake mix with 50 ingredients in it, buy an organic GF / DF cake mix, you do you! But being able to have a sweet summer treat mixed in baked in roughly 40 minutes is all I want sometimes. I don’t always want to measure things out, sift flour, and drive myself crazy in general.

Plus, when I’ve got to pit a bunch of cherries, I want to take some shortcuts elsewhere.

Cherry Cake with Vanilla Buttercream

The buttercream, though? That I’ll make from scratch. I’ve used the same proportions for YEARS, which yields a simple batch of vanilla buttercream, roughly 2 & 1/2 cups or so: 4 cups confectioners’ sugar, 2 sticks of butter, 2 tablespoons milk, 1 teaspoon vanilla extract. BOOM.

Take some shortcuts for a wonderful summer dessert! Cherry season doesn’t last for too long, and we’ve got to take advantage of it!

Cherry Cake with Vanilla Buttercream

Cherry Cake with Vanilla Buttercream

(Makes two 9″ round cakes)

Ingredients:

  • 1 & 1/2 cups cherries, pitted and chopped; this amount was yielded from 1 pint of fresh cherries.
  • 1 box yellow or white cake mix of choice
    • Add eggs, water, oil, et al, in accordance to directions listed on the mix’s box.

Vanilla Buttercream:

  • 2 sticks butter, unsalted and softened for at least 30 minutes prior to use.
  • 4 cups confectioners’ sugar, sifted
  • 2 tablespoons milk
  • 1 teaspoon vanilla extract

Directions:

1.) Preheat oven in accordance to the directions on the cake mix box, depending on the type of cake pans being used. Oil and flour cake pans; set a round of parchment paper at the bottom of each cake pan, if possible. (There is a great tutorial here!)

2.) Prepare cherries for cake mix by pitting and chopping; the chop should be fairly uniform, but it’s okay if there are a few larger pieces of cherries. Set aside.

3. ) Combine cake mix in accordance to the directions on the box. Fold in cherries until combined.

4.) Bake cakes in accordance to the directions on the box. (Should be 25 – 30 minutes.) Test doneness by inserting a toothpick into the middle of one of the cakes; if it comes out clean, the cakes are baked. Remove from oven and place on cooling rack for 10 minutes before removing from cake pans; continue to cool cakes on rack until room temperature.

5.) For the vanilla buttercream frosting, cream butter in a large bowl on medium-low speed for 2 minutes or until light and fluffy. Adding in 1/2 cup at a time, add sifted confectioners’ sugar to the butter and continue to blend. After adding in a total of 3 cups of the confectioners’ sugar, add in 1 tablespoon of milk and the 1 teaspoon of vanilla extract. Beat and add in the remaining sugar. If the mix is a little dry, add in the additional 1 tablespoon of milk.

6.) Once cake has cooled, brush off any crumbs from top and sides, and cut down the top bottom layer if you have a “cake dome”. (See tutorial here.) apply an even layer of buttercream to the top of one cake, roughly 3/4 of a cup in total. Place the second cake securely on top, and use the remaining frosting for the top and sides, spreading evenly.

7.) Enjoy this cake!

The deeper into summer we get, the more I am craving summer fruits and vegetables. The crisper and juicer, the better.

When I was home in Connecticut a few weeks ago – for a much-needed, yet socially-distanced & masked visit to my parents’ house – I took advantage of a quiet kitchen and a wide-open backyard to whip up & enjoy some foods. Cooking at my parents’ house absolutely hits differently than cooking in my NYC kitchen, despite my apartment’s kitchen being HUGE by NYC apartment standards. (No exaggeration, I can stand in the middle of the kitchen and not touch anything if I stretch both of my arms out. Nothing short of miraculous!) It’s a more peaceful and pleasurable experience.

Feeling invigorated, I whipped up some smashburgers and this salad, with my mom coming in hot with her potato salad, which is better than your mom’s potato salad. (Don’t @ me. Facts are facts.) This salad – admittedly, inspired by an ad I saw on Instagram for Stop & Shop toting their recipe for it! – hit all of those crispy and juicy notes I was craving. The addition of feta gave it a hint of saltiness, while the mint added a mellow coolness.

Cucumber Watermelon Salad

This is a super easy recipe to pull off, and it’s great for keeping in your fridge for when you need a quick meal side or a snack. It’s been a rough few months, embrace dishes that have minimal effort involved.

Cucumber Watermelon Salad

Cucumber Watermelon Salad

Ingredients:

Salad:

  • 4 cups watermelon, seeds (if any) removed & cubed; this equates to roughly 1/4 of a watermelon chunk you’d see at the grocery store.
  • 1 large English cucumber, peeled & chopped
  • 1/2 small red onion, thinly sliced
  • 1/2 cup feta cheese, crumbled
  • 1/2 cup mint, roughly chopped

Dressing:

  • 1/4 cup olive oil
  • 2 tablespoons lemon juice
  • Pinch of salt

Before We Get Started…

  • You can substitute a regular large cucumber for an English cucumber, just remember to remove the seeds before dicing!

Directions:

1.) In a large bowl, toss together all salad ingredients.

2.) In a small bowl, whisk together dressing ingredients until emulsified.

3.) Pour dressing over salad and toss thoroughly to combine. Serve immediately! (See? Told you this was an easy recipe.)

NOTE: Salad can be kept in fridge for up to 7 days. This is reported back from my parents that told me they ate the leftovers of this salad seven days after I made it. Ha!

Bread is one of my ultimate comfort foods. I know I’m not alone! (Come on…I know you love it, too!) I have warm memories of my father baking bread at home as a child. Just thinking about it, I can almost smell it. They’d send me to school with a thick slide of home-baked bread in my lunch bag, along with my carrot sticks, strawberry Fruit Roll-Up, and cinnamon-spiced apple slices. Why didn’t they make me a sandwich? I never regularly ate sandwiches – besides peanut butter sandwiches – until I was in my 20s. Old childhood food texture aversions run strongly in me. Ha!

But, I digress…

I recently discovered NYC Bakery Direct by The Bread Gal Bakery, a woman-owned NYC-area business. For the past 25+ years, they have been providing wholesale baked goods from NYC down though Philly. Their roster is rather impressive, having served at New York University, the US Open, Google, and Princeton University, among others.

They have recently started taking orders on their website for home deliveries, and their offerings are rather impressive! Their menu is expansive, offering various bread loaves, rolls, muffins, and pastries. There are vegan options, as well as gluten-free options, making it easy to satisfy anyone.

They are currently offering delivery of their baked – to – order goods! Whether you are still sticking to online ordering of food due to this pandemic, or if you are just looking for the right loaf of bread or box of croissants, New York Bakery Direct has you covered. Check out their FAQ Page for the more specific details on deliveries, which are available in NYC (Manhattan, Brooklyn, and select zip codes in Queens), Northern NJ, and The Hamptons. The minimum cost to order is $45 with a $4.95 delivery fee, with free shipping over $90 for deliveries in NYC and Northern NJ! Hint hint: Use coupon code seeksatiation for a complimentary order of six Brioche Burger Buns when you check out. 🎫 If you make a large order but realize, “Okay, maybe I need to lay off the rest of this bread for a day or two!”, products keep well in the freezer for up to three months. Perfect!

I had the pleasure of sampling many products from NYCBD’s menu. If you did not catch my Cheesy Scrambled Egg & Tomato Sandwich recipe from last week, check it out, as it features NYCBD’s pillowy and delicately sweet Brioche Burger Buns. Their Fresh Pizza Shells hold up well in the oven, producing a nice crisp crust, which I tested at 450°F for 10 minutes; I baked a few pizzas and luckily avoided the dreaded “soggy middle” issue that comes with some pre-made pizza shells. Their White Chocolate French Toast Bread is…is…so good I can’t even find the words. And their muffins? The perfect morning treat…or, late-night snack, let’s be honest. 😉

I think I’ve come to the point where I’ll let the photos speak for themselves!

(Note – Products used & photographed in this post were provided for a paid partnership with NYC Bakery Direct. All opinions are my own!)

Cheesy Scrambled Egg & Tomato Sandwich
Cheesy Scrambled Egg & Tomato Sandwich with Brioche Burger Bun
White Chocolate French Toast Bread w/ Rosé Strawberries
White Chocolate French Toast Bread w/ Rosé Strawberries & Maple Syrup
(Unbaked!) Bell Pepper & Red Onion pizza with Fresh Pizza Shell
An assortment of whole grain muffins.

For the first half of this pandemic, my daily lunch was usually a cheese quesadilla, smothered in salsa and topped with a fried egg. I determined that salsa counts as a serving of vegetables in these trying times.

Now as we’re fully into summer – hello there, July! You snuck up out of nowhere! – I’ve transitioned from that lunch into cheesy scrambled eggs with a side of summer sautéed veggies, such as zucchini, yellow squash, or tomatoes. On those days I need a few extra carbs in my belly, I’ll whip up this adorable little sandwich that is oh – so – satisfying!

Cheesy Scrambled Egg & Tomato Sandwich

Recently, I linked up with the fine folks at NYC Bakery Direct by the Bread Gal Bakery, and NYC-area woman-owned company. Once a wholesale provider to many institutions such as NYU, The Plaza Hotel, and Barclays Center, they are now providing direct – to – customer baked goods! Their simple and slightly sweet brioche buns make a perfect vessel for these savory cheddary eggs, with that thick slice of tomato in the middle providing a juicy bite. (P.S.: Keep an eye out for a full review of the many products I tried from NYC Bakery Direct later next week!)

I have to laugh a little bit at my sudden love of scrambled eggs: I was very adverse to them for, well, roughly the past 30 years. My mom said I used to love them as a kid, but soon became disgusted by them. As with most things with life, adding cheese to them makes them palatable.

(Note – Bread used in this recipe was provided for a paid partnership with NYC Bakery Direct. All opinions are my own!)

Cheesy Scrambled Egg & Tomato Sandwich

Cheesy Scrambled Egg & Tomato Sandwich

Ingredients:

  • 2 eggs
  • 3 ounces cheddar cheese (2 oz. finely shredded [for scrambled eggs), 1 oz. medium shredded [for topping sandwich])
  • Splash of milk (optional, but highly recommended)
  • 1 tablespoon butter (I’ll leave salted or unsalted up to you!)
  • 1 thick slice of tomato
  • Bread of choice (This is great served on a brioche roll, but also excellent on an English muffin!)

Directions:

1.) In a medium-sized bowl, whisk together eggs, 2 oz. of finely shredded cheddar cheese, and splash of milk until evenly combined.

2.) In a large frying pan, slowly melt butter over medium-low heat. Once melted, add scrambled egg mixture. Allow to sit for 30 seconds, untouched. Using a spatula, slowly stir eggs until curds start to form; keep gently stirring eggs until almost cooked through. Remove from heat, as they will continue to cook from the residual pan heat.

3.) Arrange sandwich on bread as follows: 1/2 of the scrambled eggs, layer of tomato, 1/2 scrambled eggs, and top with the remaining 1 oz. of cheese. Enjoy!